Thursday, January 24, 2013

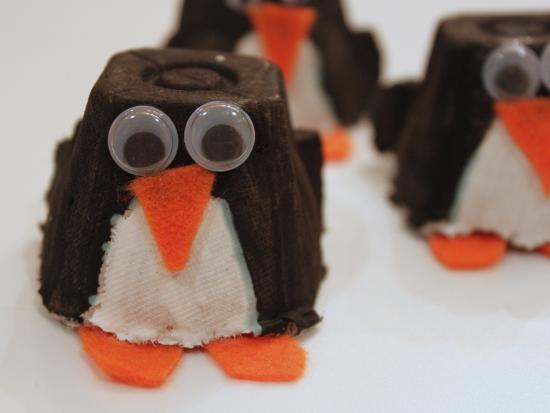
Hi everyone. Welcome back to Boredom Buster! Today we are going to make a cute winter craft. Perfect for decoration or just spending time with your friends. We are going to make a egg carton  penguin.  Here is what you will need:

1. egg carton
2. black and white paint
3. paint brushes
4. glue
5. googly eyes
6. orange felt
7. scissors
8. cup

First take your egg carton. Then take your scissors and cut the carton into individual carton sizes. Next fill up your cup with water. Then paint the whole carton black. Then when your done let it dry for about ten minutes.  While it's drying, take out your felt and scissors. Take your orange felt and cut out two hearts. The cut a triangle. When your paint is dry paint the bottom to the middle white. When that dries take your two hearts and glue it at the bottom. Then take your triangle and glue it on the carton front. Next take your googly eyes and glue it right over the eyes. There you go! You have a cute little penguin!

Wednesday, December 5, 2012

 Hello everyone. Welcome to Boredom Buster. Since it's Christmas it's the time for family time... and crafts! In Christmas there are different holidays that people from different cultures celebrate. So this month were going to make different crafts based on different cultures. Today were going to make an Almond Bird Christmas Ornament. Here is what you will need:


  • Clear spray shellac
  • Felt: red or gray
  • Embroidery floss: red, dark green, or ivory
  • Tapestry needle
  • Polyester fiberfill
  • Black crafts wire: 18-gauge
  • Needle-nose pliers
  • 1-1/2-inch-long twig
  • Hot-glue gun and glue sticks
  • Crafts glue
  • Card stock: yellow
  •  Puff Paint: black

  • After you have gathered all of your materials here is what you need to do now.

    1. Drill two small holes in the bottom of the almond where the feet will go. Wash and dry the almond and seal with three coats of shellac; let dry.
    2. Trace our patterns, available below, onto tracing paper and cut out. Cut the hat from felt, and using three strands of embroidery floss, blanket-stitch the bottom edge of the hat. Fold the hat in half with right sides together and whip stitch together straight edges. Turn the hat right side out and stuff with polyester fiberfill. Stitch through the top of the hat with six strands of embroidery floss. Tie the floss ends in a knot for a hanging loop.
    3. Using needle-nose pliers and referring to our pattern, shape a 10-inch length of wire into a leg and foot. Bend the wire ends slightly upward to form ankles, and bend the toes slightly downward. Repeat to make the second leg and foot.
    4. Hot-glue the hat to the top of the almond. Trim the wire at the top of the legs to desired length; glue leg ends into the holes in the bottom of the almond using crafts glue.
    5. Glue feet onto twig; hold or clamp until dry.
    6. Cut a small diamond shape from yellow card stock. Fold diamond at center and glue to almond for a beak. Add a dot of puff paint for each eye.

    There you go! You got a homemade ornament.It's great for a present.Or if you want you could just hang it on your tree with pride. I hope you had a lot of fun making this. Tell your family and friends about this crafts so they could have just as fun as you did!


    Tuesday, November 13, 2012

    Hello everyone.Today we are going to make Squash Softies. Yes it has a funny name, but it's fun to make. Since we had some left over pumpkins, I decided to make it into something new. Here is what you'll need:

    1.a small pumpkin(s)
    2. a short stick
    3. fake fur,fleece or other fabric
    4.scissors
    5.hot glue or crazy glue
    6. a knife
      

         First take you knife and cut of the stem of your pumpkin. Next take your fabric and scissors. Take your pumpkin and put it on top of the fabric.Then wrap the fabric around the pumpkin. Use your crazy hot hot glue to stick it on. Be extra careful when using hot glue. Let it dry completely before doing the next step.I will take about ten minutes to dry. When its done drying, cut off the extra fabric.Next place your stick in the middle where you cut of the stem. Use your crazy or hot glue to stick the stick on. Hope you like this activity! Come back soon to bust your boredom!
    Fabric Pumpkin Halloween Decorations

    Wednesday, November 7, 2012

    Hello everyone! Sorry about the delay of blog posts, hurricain Sandy interupted. My power was down for a week. The good thing is that I had lots of time to come up with fun creative fall crafts. Your going to be busy for the next couple of weeks! Today were going to make a natral fall wreath. It's fun and simple and you don't need a lot of tools for this.
    What you'll need:
     
    1.card board (make sure you could cut it!)
    2.glue or if you want to staples ( I recomend glue)
    3.scissors
    4.pencil

    First you want to go outside and collect fall leaves. Try to vary the sizes and shapes. Also, try to collect different colors. Make sure you have enough to cover the whole thing. Make sure it is dry! If it is wet,it won't work! While it's drying,take out a scissors and your card board. First get out a plate or something thats big and round.Trace it carefully and make sure it's big enough. Cut out the circle so that the line you drew is not showing.But be warned,cutting card board is very hard to do. There is special scissors that are used for cutting card board.If you don't have that plain scissors will be fine. After you cut it make a smaller hole in the middle. You could use a cup or a bowl used for babies. Make sure yoou trace it first then cut it. Now take your leaves and glue it on the board. To make it faster put the glue on the card board and then plaster the leaves on. Make sure the whole thing is covered before you put it to dry. There you go, you've got a wonderful wreath for the fall. Hang it in your room or the front tof the door. Wherever you hang it hang it with pride! To hang it you could fold duck tape and tape
     
     it in the back. There you go! Hope you had a fun time! Come back later for more crafts! 


    Thursday, October 18, 2012

            Hi everyone! Hope you liked the costume idea.Here is something you could do for Halloween. First blow up a balloon.Then take flour and water and mix it together.Make it liquid and not to mushy. Then take some newspaper(make sure no ones reading it!)and cut it up in long,thin strips.Dip the newspaper strips in the liquid. When you put the newspaper  in long enough,stick it on the balloon.Keep on doing that until the whole balloon is covered.Let it dry completely.Then the next day do the same thing on the same balloon.Your just adding another coat and making sure everything is covered.When your done let it dry for about a day.Now it's time to paint the balloon white.When it dries,take a black marker and make a scream face.When your done with that take some white cloth and stick it at the side of the balloon.There you go you had made a scary ghost that will scare you friends out of there shoes.Bye!

    Tuesday, October 9, 2012

                                                        Boredom Buster


    Hello everyone.I hope everyone had fun making my crafts.Today were making more costumes.Today were making a  fairy costum.Its  simple and cheap to make.First  here are some supplies:

    1.a skirt or tutu(make it a bold  color)
    2.tights(make it a differnt color than tutu)
    3.glitter
    4.fairy wings
    5.paper crown
    6.make up
    7.t-shirt
    First take your tights and cut holes in it.Then take white cloth and cut the cloth a little more bigger than the cuts in you tights.Use glue and apply glitter on the white cloth.Then apply fabric glue on your tights.Make sure it dries complety before you put it on.Next you want to make your crown.
     On your piece of paper draw around a plate and cut it out.
     Cut the piece of paper in half.
     Roll the paper to make a cone. Fold the cone so the paper is divided into thirds.
     Using the scissors carefully cut bits out of your paper – making sure you don’t cut away all the folds (or it will fall apart!)
    You can fold the paper and cut again if you want to have a more fancy pattern.
    Take a strip of card big enough to go around your head and stick your cut out to the band.And now you have a crown! Your fairy outfit is done.You could always add fairy wings and a wand which you could get at Target or Walmart.Adding make up is also up to you.If  you put on make up,put some glitter eyeshadow(make sure it doesn't match with your tutu and tights)    There you go! You got yourself a fun fairy costum.Bye!

    Tuesday, October 2, 2012

                                                                Boredom Buster

    Hello everyone! I hope you had fun making your caterpillar pumpkin.In 4th grade I entered that exact pumpkin and got a prize for the most funniest pumpkin.But now its time to make some Halloween costumes!This week costume is a zombiefind nurse .
    Supplies For Your Nurse Costuems :       

    White dress(or if you cant find one,use a white t-shirt and skirt)
    Red felt
    White felt
    Glue
    Iron-on interfacing(optional)
    Cardboard scrap
    Bobby pins
    White stockings
    White shoes
    Fake blood
    Scissors
    zombie make up(optional)
    Those are some supplies that you'll need.
    First you take the red felt and cut patterns of designs. Do it however you want to.I suggest using the red and white felt to make a cross sign and glue it to the middle of your costume.Use the scissors to cut the felt in little strips then glue it on  in a shape as a pocket.Next  cut out a nurses hat shape from a scrap of thin cardboard such as a cereal box. Glue on white felt and another red cross in the center. After the nurse's hat dries, you will secure it in your hair with bobby pins.Now here comes the fun part.Take the scissors and cut holes in your dress and stockings.(with permission)Vary the size of the holes.Make some really big and some medium sized.Now take your fake blood(avalible at Target and Walmart)  and smear it around the holes.For a even more dramatic look take a bit of fake blood and put it on your skin.Also when putting blood on your dress,make sure you target the important body parts like the heart or around the brain.Now if you like,you can take some make up and touch up your face a bit.Add some blood,stitches,or anything you would like.There you go you got yourself a zombiefind nurse outfit.